Chicken Potpie Soup

IMG_3294

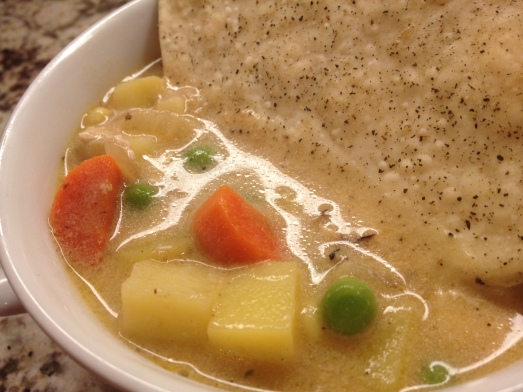
There is something so comforting about eating a nice warm bowl of soup on a cold winter night! We love soup in this house and could eat it all of the time. When I saw this recipe in the December 2012 issue of the Food Network Magazine, I knew I had to try it. We were not disappointed, the kids loved that the pie dough was dunkable. This soup was hearty and delicious and tasted just like Chicken Potpie (but not as thick and creamy so it’s probably healthier)! I made some small changes, I used fresh carrots instead of frozen and added some corn because my kiddos love corn. Other than that here is the recipe:

  • 1 disk refrigerated pie dough
  • Freshly ground pepper
  • 1/2 teaspoon plus a pinch of poultry seasoning (I did not have this so I didn’t use)
  • 2 Tablespoons unsalted butter
  • 1 pound skinless, boneless chicken breasts, cut into 1/2″ pieces
  • Kosher salt
  • 2 stalks celery, chopped (I’m not a big fan of celery so I did not use any)
  • 1 medium onion, chopped
  • 1/4 cup flour
  • 4 cups low-sodium chicken broth
  • 1 cup half-and-half
  • 3 medium Yukon gold potatoes, chopped
  • 1 10-ounce package frozen mixed peas and carrots (I used 2 fresh carrots, a cup of frozen peas and a cup of frozen corn)
  1. Preheat the oven to 425 degrees. Unroll the pie dough onto a baking sheet and sprinkle with pepper and a pinch of poultry seasoning; cut into quarters. Bake until puffed and golden, about 10 minutes.
  2. Meanwhile, melt the butter in a large pot over medium-high heat. Add the chicken and 1/2 teaspoon salt and cook, undisturbed, 2 minutes, then cook, stirring, 1 more minute. Transfer to a bowl.
  3. Add the celery (if using), onion, fresh carrots (if using fresh instead of frozen), flour, 1/2 teaspoon salt and the remaining 1/2 teaspoon poultry seasoning to the pot and cook, stirring, 1 minute. Stir in 1 cup water, the broth, half-and-half and potatoes; cover and bring to a simmer. Reduce the heat to medium and simmer, partially covered 10 minutes. Add the peas and carrots (If using frozen carrots), corn and simmer until the vegetables are tender, about 6 minutes. Return the chicken to the pot and simmer until cooked through, about 1 minute. You can add a little more seasoning to taste here if you would like. Divide among bowls and top with the crust.

Bacon Hasselback Potatoes

Well this recipe had me at Potatoes, bacon and garlic! These Bacon Hasselback Potatoes were so good, everyone loved them! My husband said that they would serve something like this in a fancy restaurant.

I was looking through my latest issue of the Food Network magazine, when I came across this recipe. I changed it up just slightly, I used Russet potatoes instead of Yukon Gold, and I only made 6 instead of 12. Which gave my potatoes more bacon and garlic butter topping per potato. I’m going to give you the recipe like it was written in the magazine but just know that it is versatile.

The ingredients are:

  • 4 slices thick-cut bacon, each cut crosswise into 9 pieces
  • Kosher salt
  • 12 medium Yukon gold potatoes, peeled
  • 1 stick unsalted butter (I used regular salted butter)
  • Sea salt and freshly ground pepper
  • 2 scallions, finely chopped
  • 2 tablespoons finely chopped fresh parsley (I didn’t have, so I didn’t use)
  • 1 clove garlic. finely chopped
  1. Lay the bacon pieces on a baking sheet and freeze until hard, about 30 minutes. Meanwhile, preheat the oven to 350 degrees. Bring a large pot of salted water to a boil.
  2. Using a sharp knife, make crosswise cuts in each potato, about 1/8 inch apart, stopping about 1/4 inch from the bottom.
  3. Add the potatoes to the boiling water and cook 4 minutes. Remove with a slotted spoon and carefully transfer to a baking sheet (I used a round stoneware baking dish); let cool slightly. Pat the potatoes dry, then insert 3 pieces of the frozen bacon into the cuts of each potato, spacing the bacon evenly and letting it poke out of the top. Melt 5 tablespoons butter and brush generously over the potatoes and in the cuts. Reserve any excess butter for basting. Season the potatoes with salt and pepper.
  4. Transfer the potatoes to the oven and bake until the outsides are browned and crisp, about 2 hours, basting halfway through with the reserved melted butter.
  5. When the potatoes are almost done, melt the remaining 3 tablespoons butter and mix with the scallions, parsley and garlic. Spoon over the potatoes and roast 5 more minutes. Transfer to a platter and season with salt and pepper (if needed).

Total time needed to make this is 3 hours so plan ahead!


Pumpkin Nut Cups

I got the cutest cookbook from my sister-in-law last year (thanks again Lisa), Gooseberry Patch Taste of Autumn. In this cookbook are so many delicious looking Autumn recipes! This is where I got this recipe for Pumpkin Nut Cups. I served these for a fundraiser I hosted at my house for the Juvenile Diabetes Research Foundation (JDRF). We all loved these! They would be perfect for the holidays as well. I made some with Pecans and then made smaller ones in my mini muffin pan without nuts. This is a very versatile recipe, that can be changed and adjusted to fit anyones taste! The ingredients are:

  • 1/2 cup butter, softened
  • 3-oz. pkg. cream cheese, softened
  • 1 cup flour
  • 3/4 cup brown sugar, packed and divided
  • 1/4 cup canned pumpkin
  • 1 egg yolk
  • 1 T. half-and-half
  • 1 T. plus 4 t. butter, melted
  • 1/4 t. rum extract
  • 1 t. vanilla extract
  • 1/8 t. cinnamon
  • 1/8 t. nutmeg
  • 1/2 cup chopped pecans
  1. In a medium mixing bowl, blend 1/2 cup butter and cream cheese with an electric mixer until well blended; stir in flour. Divide dough into 24 balls, one inch in diameter, and press the dough evenly into the bottoms and up sides of twenty-four, 1-3/4 inch muffin cups. Bake at 325 degrees for 10 minutes.
  2. Combine 1/2 cup brown sugar, pumpkin, egg yolk, half-and-half, 4 teaspoons butter, extracts, cinnamon, and nutmeg; spoon evenly into warm dough cups. Stir together nuts with remaining brown sugar and butter; sprinkle over pumpkin mixture. Bake for 25 additional minutes. Cool in pans for 10 minutes; loosen and remove from pans. Serve warm or cool.

Makes 2 dozen

Chicken Marsala

This is one of my favorite dishes to order when we go out to eat Italian. So when I saw this recipe in my Phyllis Hoffman Celebrate Spring 2012 magazine I knew that I had to try it. I never knew it was so easy to make. We all loved this recipe! It was just as good as what I order at our favorite Italian restaurant! Will be making this many many more times to come. Here are the ingredients:

  • 1/4 cup plus 2 Tablespoons extra-virgin olive oil
  • 2 cups sliced white button mushrooms
  • 8 thin chicken breast cutlets
  • 1/2 teaspoon garlic salt
  • 1/4 teaspoon freshly ground black pepper
  • 1 cup flour
  • 1 cup Marsala wine
  • 1 cup chicken stock
  • 1 Tablespoon butter

Garnish: chopped parsley

  1. In a large nonstick saute pan, heat 2 tablespoons olive oil on medium-high heat. Cook mushrooms, stirring occasionally, until tender. Remove from pan, and set aside.
  2. Season chicken breasts on both sides with garlic salt and black pepper. Dredge in flour, shaking off excess. In same pan, heat remaining 1/4 cup olive oil on medium-high heat. Cook chicken breasts, in batches, 3 to 5 minutes on each side, or until golden brown. (If browning too quickly, reduce heat to medium, and add oil if needed.) Remove chicken from pan; set aside.
  3. Deglaze pan with wine, using a wire whisk and stirring briskly to loosen brown bits from bottom of pan. Cook for 1 to 2 minutes, stirring constantly. Add chicken stock and butter, whisking to combine. Return chicken and mushrooms to pan, and cook until heated through. Garnish with chopped parsley, if desired. Serve with pasta!

Ghost Brownies

Here is a super fun and easy dessert to make for Halloween! It’s so easy you don’t even really need a recipe. Just make a 9 x 13 pan of your favorite brownies (boxed or homemade it doesn’t matter). Cut them into squares, unless you have a brownie pan like me and then it does that for you (thanks dad I love my brownie pan)! Place a large marshmallow on top of each square. Get a container of vanilla frosting, take the tops off and microwave for 20 seconds. This makes the frosting looser so that you can drizzle it over the marshmallow. Drizzle about a tablespoon of frosting over the marshmallow. Allow frosting to set for about 10 minutes and then with black decorating gel pipe on eyes and mouth. That’s it, nothing fancy. The kids were so excited when I brought these over to dinner the other night. they loved them!


Apple Pie Bars

I made these yummy Apple Pie Bars the other night when the family came over for dinner. I found the recipe in an old Taste Of Home magazine. It won the grand prize for their Dessert bar contest and I definitely now know why. These Apple Pie Bars had all of the delicious goodness of a home-made apple pie in the form of a bar cookie. This is a very good way to serve apple pie to a larger crowd. My very bad picture-taking skills does these no justice, (to dark) sorry! Anyway……. Here’s the recipe..

  • 4 cups flour
  • 1 teaspoon salt
  • 1 teaspoon baking powder
  • 1 cup shortening
  • 4 egg yolks
  • 2 Tablespoons lemon juice
  • 8 to 10 Tablespoons cold water

Filling:

  • 7 cups finely chopped peeled apples
  • 2 cups sugar
  • 1/4 cup flour
  • 2 teaspoons ground cinnamon
  • dash ground nutmeg

Glaze:

  • 1 cup confectioners’ sugar
  • 1 Tablespoon milk
  • 1 Tablespoon lemon juice
  1. In a bowl combine flour, salt and baking powder. Cut in shortening until mixture resembles coarse crumbs. In a small bowl, whisk egg yolks, lemon juice and water; gradually add to flour mixture, tossing with a fork until dough forms a ball. Divide in half. Chill for 30 minutes.
  2. Roll out one portion of dough between two large sheets of waxed paper into a 17-in. x 12-in. rectangle. Transfer to an ungreased 15-in. x 10-in. x 1-in. baking pan. Press pastry onto the bottom and up the sides of pan; trim pastry even with top edge.
  3. In a bowl, toss the apples, sugar, flour, cinnamon and nutmeg; spread over crust. Roll out remaining pastry to fit top of pan; place over filling. Trim edges; brush edges between pastry with water or milk; pinch to seal. Cut slits in top. Bake at 375 for 45-50 minutes or until golden brown. Cool on a wire rack. Combine glaze ingredients until smooth; drizzle over bars before cutting.

DIY Furniture polish

I had to take a time out from cleaning to share with you this recipe for DIY Furniture polish. I have to admit, I’m starting to become addicted to this whole DIY world. I love the idea of making my own all natural products at home. Besides for the fact that it’s better for my family’s health and the environment and it costs way less, It’s fun! This recipe doesn’t make a lot so you can double or triple it if you would like, but it goes a long way. I’ve been polishing everything in my house for the last two days. From my table, kitchen cabinets, granite countertops, to my stainless steel appliances. My kids better watch out I’m on a rampage ( a little olive oil and vinegar couldn’t hurt, right?) I came across this recipe in one of my Allyou magazines. I don’t think I will ever buy furniture polish again. It gave the wood a light shine but cleaned it at the same time and even though I could smell the vinegar, I didn’t mind. I buy olive oil and vinegar in bulk and I have a lemon tree in the back yard so this literally cost me pennies to make. So here it is, DIY furniture polish!

You’ll need:

  • Funnel
  • Measuring cup and spoons
  • Plastic squirt bottle
  • Microfiber cloth

Ingredients:

  • 4 Tbsp. olive oil
  • 1/2 cup distilled white vinegar
  • 1/2 tsp. fresh lemon juice (or lemon oil)

Instructions:

  • Using funnel, pour olive oil, vinegar and lemon juice into bottle. Shake well to emulsify. Squirt polish onto microfiber cloth and rub onto finished-wood furniture. Always go with the grain and evenly distribute polish. Remove any excess polish with a clean cloth.


Ricotta mini cakes

These are called mini cakes but are definitely a cookie. We all loved these! My mom said that my Italian great-grandmother used to make something like this, but she thinks that she used almond extract instead of vanilla. I wish I had all of my great grandmas recipes written down by her, for me to treasure forever but I don’t. So it leaves me searching. In my search I came across this recipe in an old Family Circle magazine and I knew that I had to try it. I might try almond next time but the vanilla is delicious! I added sprinkles to some of the cookies while the frosting was still wet, just for fun. Enjoy!

The ingredients are:

Cookies

  • 2 1/4 cups flour
  • 1 teaspoon baking powder
  • 1/2 teaspoon baking soda
  • 1/8 teaspoon salt
  • 1/2 cup (1 stick) unsalted butter, softened
  • 1 cup granulated sugar
  • 1 egg
  • 1 cup ricotta
  • 1 teaspoon vanilla extract

Glaze

  • 2 cups confectioners sugar
  • 3 Tablespoons milk

Cookies:

  1. Heat oven to 350 degrees. Coat 2 baking sheets with nonstick cooking spray. Whisk flour, baking powder, baking soda and salt together; set aside.
  2. Beat butter and granulated sugar together until blended. Add egg, ricotta and vanilla, beating until combined.
  3. On low-speed, add flour mixture and beat until blended. Drop by tablespoonfuls onto prepared pans. Bake at 350 for 13 minutes or until lightly browned around edges. Let cool on sheets 3 minutes, then remove to rack to cool completely.

Glaze:

  1. Beat cofectioners’ sugar and milk together until well blended. Dip tops of cookies into glaze and set aside (this is when I put on the sprinkles) until glaze has hardened.

Creamy Grape Salad

Last night we had family over for my daughter’s birthday. The food was so yummy and I have some recipes to share with you per quite a few requests. I made teriyaki beef and chicken skewers (will post that recipe later), corn on the cob, this Creamy Grape Salad, Funfetti cupcakes with vanilla buttercream frosting, and butterscotch cheesecake. My grandma made her Italian style pasta salad that everyone loves (will post this recipe as well), and my mom made a green salad with strawberries and fresh steamed golden beets (my daughter loves fresh beets). I’m posting this recipe first because my best friend wants to make this for her family BBQ today. Miss, I hope they love it as much as we did! This is so easy to make and soooo delicious! I made it earlier in the day, put it in the fridge till I was ready to serve it. Right before I was ready to serve it I sprinkled the brown sugar and chopped pecans over the top. I have to say I actually contemplated not putting the chopped pecans on, I was worried that some wouldn’t like the nuts. I am so glad that I put them on though, It really added to the dish and gave it a little texture. No one complained and even if they didn’t like nuts it was only sprinkled over the top so they could easily get some without. So here it is Creamy Grape Salad, (I got the recipe from Taste of Home).

The ingredients are:

  • 1 package (8 oz.) cream cheese, softened
  • 1 cup (8 oz.) sour cream
  • 1/3 cup sugar
  • 2 teaspoons vanilla extract
  • 2 pounds seedless red grapes
  • 2 pounds seedless green grapes
  • 3 tablespoons brown sugar
  • 3 tablespoons chopped pecans
  1. In a large bowl, beat the cream cheese, sour cream, sugar and vanilla until blended. Add grapes and toss to coat.
  2. Transfer to a serving bowl. Cover and refrigerate until serving. Sprinkle with brown sugar and pecans just before serving.

Yield: 21-24 servings

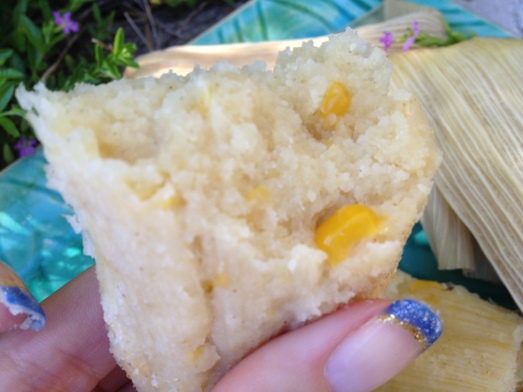
Creamed Corn Tamales


This last weekend was my Aunts birthday and we had a mexican themed diner for her. I made these Creamed Corn Tamales. I found the recipe in an old Food Network Magazine, November 2011 from Chef Santos Loo. We really liked these tamales even though my family has renamed them, sweet corn cakes. I guess that is what they tasted like to us. I was also thinking that these would be good with some green chillies and some Monterey jack cheese. They are not like a traditional meat tamales, they are more simple and have a slight sweetness. The kids loved them and we will be making them again.

The ingredients are:

  • 25 to 30 dried corn husks
  • 2 1/2 cups masa harina (instant corn flour)
  • 1 cup sugar
  • 1 (14.75-ounce) can cream-style corn
  • 1 stick unsalted butter, softened
  1. Soak the corn husks in a bowl of hot water until pliable, about 15 minutes.
  2. Meanwhile, make the dough: Combine the masa harina and sugar in a large bowl. Stir in the corn and 1/2 cup hot water until combined. Add the butter and mix with your hands until evenly distributed.
  3. Remove the corn husks from the water and shake dry. Unfold the husks on a clean surface (discard any small husks or husks with holes). Put about 1/4 cup dough down the center of a husk; fold in the long sides to enclose the filling, then fold in the top and bottom to make a packet. Secure with kitchen twine. Repeat with the remaining dough and husks.
  4. Set up a steamer basket in a large pot filled with 2 inches of water. Arrange the tamales standing up in the steamer and bring the water to a boil over high heat. Reduce the heat to medium, cover and cook until the tamales are firm, about 1 hour. Remove from the steamer and let rest 10 minutes before unwrapping.