Creamed Corn Tamales


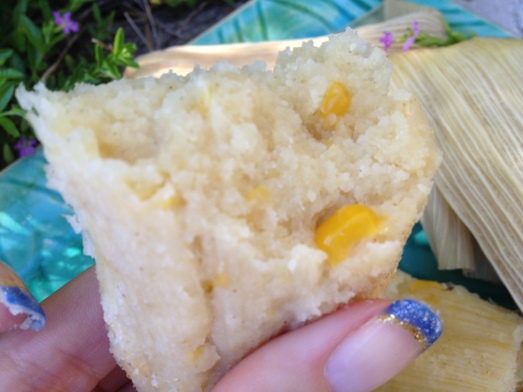
This last weekend was my Aunts birthday and we had a mexican themed diner for her. I made these Creamed Corn Tamales. I found the recipe in an old Food Network Magazine, November 2011 from Chef Santos Loo. We really liked these tamales even though my family has renamed them, sweet corn cakes. I guess that is what they tasted like to us. I was also thinking that these would be good with some green chillies and some Monterey jack cheese. They are not like a traditional meat tamales, they are more simple and have a slight sweetness. The kids loved them and we will be making them again.

The ingredients are:

  • 25 to 30 dried corn husks
  • 2 1/2 cups masa harina (instant corn flour)
  • 1 cup sugar
  • 1 (14.75-ounce) can cream-style corn
  • 1 stick unsalted butter, softened
  1. Soak the corn husks in a bowl of hot water until pliable, about 15 minutes.
  2. Meanwhile, make the dough: Combine the masa harina and sugar in a large bowl. Stir in the corn and 1/2 cup hot water until combined. Add the butter and mix with your hands until evenly distributed.
  3. Remove the corn husks from the water and shake dry. Unfold the husks on a clean surface (discard any small husks or husks with holes). Put about 1/4 cup dough down the center of a husk; fold in the long sides to enclose the filling, then fold in the top and bottom to make a packet. Secure with kitchen twine. Repeat with the remaining dough and husks.
  4. Set up a steamer basket in a large pot filled with 2 inches of water. Arrange the tamales standing up in the steamer and bring the water to a boil over high heat. Reduce the heat to medium, cover and cook until the tamales are firm, about 1 hour. Remove from the steamer and let rest 10 minutes before unwrapping.


DIY Headbands

My daughter plays travel softball and just recently her team made it to a big national tournament. We thought it would be fun to make matching headbands for all the girls on the team. This was a fun project for my daughter and I, and the headbands looked adorable on the girls. You can choose any color combo to match any teams colors. You could even make headbands to match any outfit for school. At the beginning of every school year I make matching hair accessories for my daughters new outfits, it’s much cheaper and way cuter. I’ll show how to make bows and clips in another post.

First we went to Micheal’s to pick out our supplies.

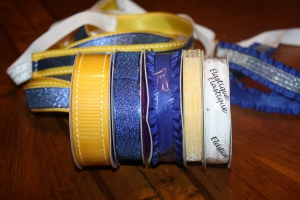
Choose two colors of ribbon. You want the bottom ribbon to be wider than the top so both colors show. I measured the ribbon to my daughters head then cut both colors the same. You will also need elastic. It is sold by the ribbon. Cut pieces of elastic, remember that the elastic stretches so you don’t need that big of a piece. You want the headband to fit snug so it does not slip off.

We used a permanent glue to glue both pieces of ribbon together. this is what it looks like. Make sure it says permanent.

Once everything was cut and glued we carefully burnt the ends of the ribbon. This is to prevent the ribbon from fraying. Then we sewed the elastic to the ribbon.

Then you are done! We made one sample first to make sure that it fit and that everything looked right.

Artichoke and Tomato Panzanella

My Aunt Johnnie brought this Artichoke and Tomato Panzanella salad over to one of our family dinners and we all loved it! I had never tried Panzanella salad before but had been curious about it for a while now. I thought that the bread would get soggy and yucky and that didn’t appeal to me at all. The bread in this salad was delicious and even though it absorbed some of the flavors it still stayed crisp arround the edges. The bread with the fresh tomatoes, artichokes and olives was wonderful! Aunt Johnnie adapted the recipe from one of Giada De Laurentis’.

The ingredients are:

  • 3 cups 1-1/2 inch-cubed Ciabatta bread
  • 2 cans artichoke hearts in water (it looks like halves or quarters)
  • 2/3 cup extra-virgin olive oil, plus more for drizzling
  • 1/2 teaspoon salt, plus more for seasoning
  • 1/2 teaspoon freshly ground black pepper, plus more for seasoning
  • 3 large red tomatoes, cut into wedges (about 2 pounds)
  • 1 cup pitted black olives, halved
  • 1/2 cup manzanilla olives, halved
  • 3/4 cup chopped fresh basil leaves (about 1 bunch)
  • 1/4 cup white wine vinegar
  1. Place a grill pan over medium-high heat or preheat a gas or charcoal grill. Drizzle the bread with olive oil and season with salt and pepper. Grill the bread until golden brown at the edges, about 6 minutes total, turning every 2 to 3 minutes. Remove the bread from the grill and transfer to a large bowl.
  2. Add the tomatoes, artichoke hearts, olives and basil to the bowl and toss to combine. In a small bowl, stir together the olive oil, white wine vinegar, 1/2 teaspoon salt and 1/2 teaspoon pepper. Drizzle the dressing over the salad. Toss to combine and serve immediately.

Roasted Shrimp Cocktail


This recipe is a Barefoot Contessa recipe that was featured in the Food Network Magazine back in December 2011. The whole family loves shrimp cocktail but I had never seen it prepared this way. So I decided to give it a try (plus I love Ina, the Barefoot Contessa). This Roasted Shrimp Cocktail was great! The pepper and the fresh lemon zest gave the shrimp great flavor. The homemade cocktail sauce was good and gave the shrimp a big kick (and I didn’t even use all of the horseradish and Tabasco sauce that it called for). This makes the perfect appetizer for any party or get-together!

The ingredients are:

For the Shrimp

  • 2 pounds (12 to 15 count) shrimp
  • 1 Tablespoon good olive oil
  • 1/2 teaspoon kosher salt
  • 1/2 teaspoon freshly ground black pepper

For the Sauce

  • 1/2 cup Heinz chili sauce
  • 1/2 cup Heinz ketchup
  • 3 tablespoons prepared horseradish (I used 2 T)
  • 2 teaspoons freshly squeezed lemon juice, plus lemon zest for topping
  • 1/2 teaspoon Worcestershire sauce
  • 1/4 teaspoon Tabasco sauce (I used about half this)
  1. Preheat the oven to 400.
  2. Peel and devein the shrimp, leaving the tails on. Place on a sheet pan with the olive oil, salt and pepper and spread them in one layer. Roast for 8 to 10 minutes, just until pink, firm and cooked through. Set aside to cool.
  3. For the sauce, mix the chili sauce, ketchup, horseradish, lemon juice, Worcestershire sauce and Tabasco. Top the shrimp with lemon zest and serve with the sauce.


Rigatoni with Tomato Cream Sauce


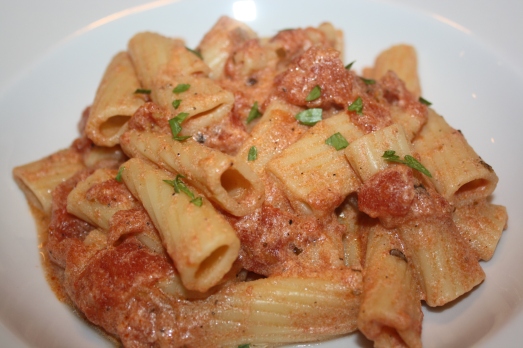
As it states in the title of this blog, I am a very busy mom. I am always on the look-out for recipes that I could throw together in a hurry. This recipe is definitely one of those to have on hand for those busy nights. Soccer didn’t get over till 7:00 tonight and I did not want to feed my kids fast food…….. I was able to get this Rigatoni with Tomato Cream Sauce made for them in less than 30 minutes and they really liked it. My son had his friend over for dinner and he even asked for seconds. I will be making this again for sure!

The ingredients are:

  • 16 oz. Rigatoni
  • 2 Tablespoons Butter
  • 1 clove Garlic, crushed
  • 14 oz. canned, Italian style stewed tomatoes
  • 1 Cup half and half
  • 6 fresh basil leaves, torn
  • salt and pepper to taste
  1. Saute garlic in butter. Add tomatoes. Break up tomatoes with a spoon while stirring. Cook for 10 minutes.
  2. In a separate pan boil half and half until reduced by half (5-10 minutes). Add tomato mixture. Add basil (I didn’t have fresh basil on hand so I sprinkled fresh parsley over the top), salt and pepper. Toss with rigatoni. (I didn’t end up using all of the rigatoni, next time I think I will double the sauce.)